Save
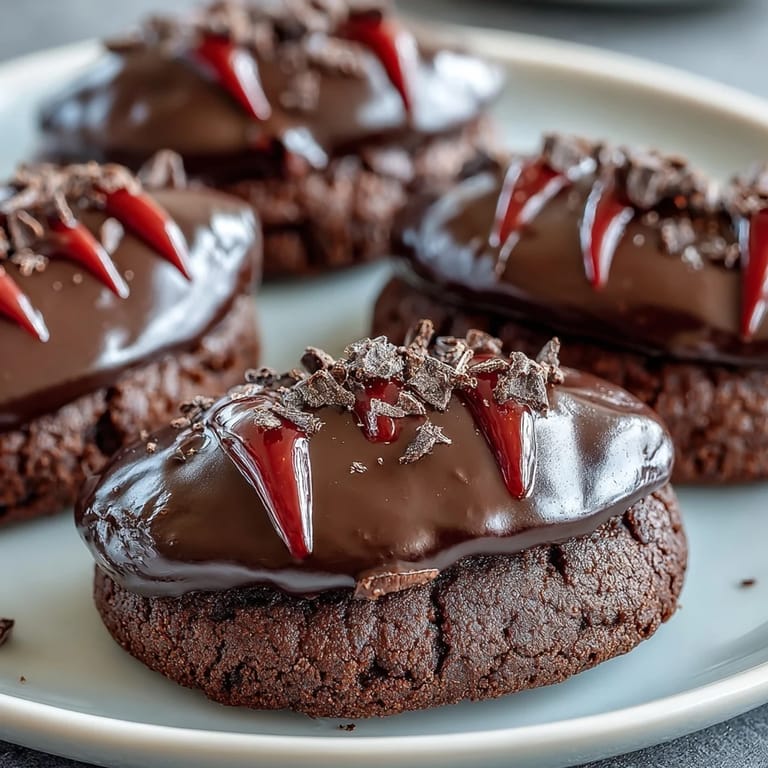
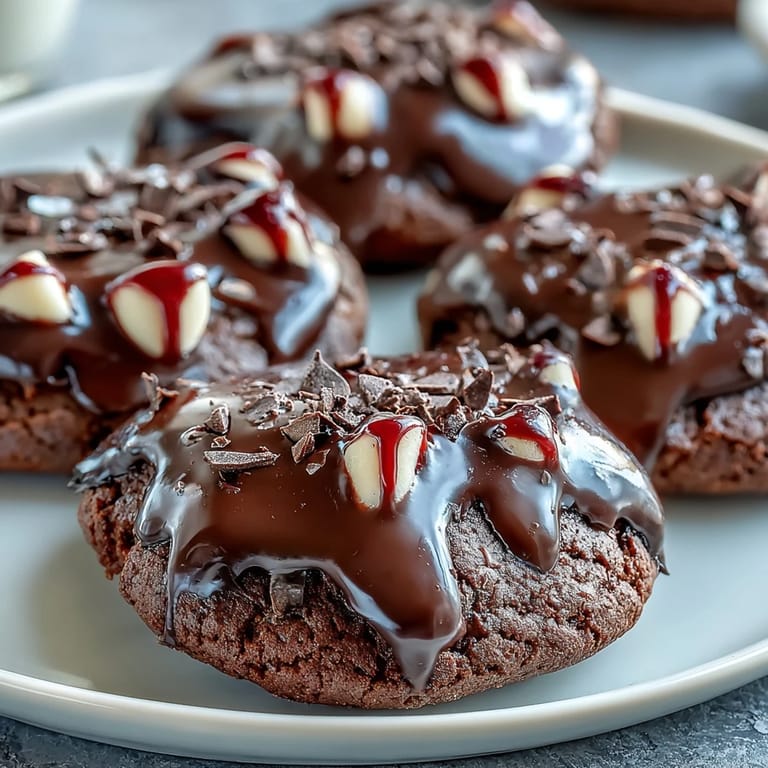
Save My nephew burst through the kitchen door in October wearing a plastic vampire cape, demanding we make "the coolest cookies ever." I had no idea what that meant until he pulled up a picture of black cookies with white fangs jutting out menacingly. What started as a throwaway Halloween idea became our annual tradition, and honestly, these chocolate vampire cookies are so good that even the non-spooky months feel like they're missing something.
I'll never forget when my sister's book club showed up unannounced on a random Wednesday evening, and I pulled these out of the freezer where I always keep extras. The moment they bit into one and that chewy center gave way, the entire mood shifted from polite chatter to pure indulgence. Someone asked if I'd bought them from a bakery, and I knew right then these cookies had crossed into something special.
Ingredients
- All-purpose flour (2 cups): This is your structure—don't sift it unless you want cookies that spread too thin and lose that perfect chewy center.
- Unsweetened cocoa powder (¾ cup): Use the real stuff, not hot cocoa mix; the difference in depth of flavor is honestly night and day.
- Baking soda (1 tsp): This is what gives you that lift and helps create those slightly crispy edges while keeping the middle soft.
- Salt (½ tsp): Never skip this—it's the secret amplifier that makes chocolate taste more chocolatey.
- Unsalted butter (1 cup), softened: Softened means it should leave a dent when you press it; this is non-negotiable for fluffy dough.
- Granulated sugar (1 cup) and light brown sugar (½ cup): The brown sugar brings moisture and a subtle molasses note that prevents dryness.
- Large eggs (2): They need to be at room temperature or your dough will break; cold eggs are the silent killer of cookie texture.
- Pure vanilla extract (2 tsp): Real vanilla matters here because these cookies are simple enough that every ingredient shows its face.
- Semisweet chocolate chips (1 cup): Don't use cheap chips; they taste waxy and you deserve better.
- Candy fangs or white jelly beans (48 total): The fangs are the entire personality of this recipe, so hunt down quality ones if you can.
- Red gel icing (¼ cup): This is pure theater, but theater is what makes Halloween worth the effort.
Tired of Takeout? 🥡
Get 10 meals you can make faster than delivery arrives. Seriously.
One email. No spam. Unsubscribe anytime.
Instructions
- Gather and prep everything:
- Preheat your oven to 350°F and line two baking sheets with parchment paper. Having everything ready before you start mixing is the difference between smooth sailing and scrambling halfway through.
- Mix your dry team:
- Whisk together flour, cocoa powder, baking soda, and salt in a medium bowl until no cocoa streaks remain. This step ensures even distribution of the leavening agent so every cookie rises and sets the same way.
- Cream the butter and sugars:
- In a large bowl, beat softened butter with both sugars until it's pale, fluffy, and takes about 2 to 3 minutes—you're essentially aerating the butter, which creates lift. When you're done, it should look almost like frosting in texture.
- Add eggs and vanilla:
- Beat in one egg at a time, making sure each one is fully incorporated before adding the next, then mix in vanilla extract. This patient approach prevents the mixture from looking curdled or broken.
- Combine wet and dry:
- Gently add the dry mixture to the wet ingredients in a few additions, mixing until just combined—overmixing triggers gluten development and makes cookies tough. You want the dough to come together without any visible flour streaks.
- Fold in chocolate chips:
- Use a spatula to fold in the chocolate chips so they're distributed evenly throughout. This is gentler than mixing and preserves the air you've worked so hard to incorporate.
- Scoop and space:
- Using a tablespoon or small cookie scoop, portion dough onto prepared sheets with 2 inches between each cookie. They'll puff up and spread slightly, so cramming them close together creates misshapen cookies that bake unevenly.
- Bake to the sweet spot:
- Bake for 9 to 11 minutes—they should look set at the edges but still soft and slightly underdone in the very center. Pulling them out slightly early is the secret to that coveted chewy middle.
- Cool and transfer:
- Let cookies rest on the baking sheet for 5 minutes to firm up enough to move, then transfer to a wire rack. This brief pause prevents them from falling apart when you pick them up.
- Install the fangs:
- While the cookies are still slightly warm (not hot, not room temperature), gently press two candy fangs into each cookie as if they're vampire teeth. The warmth softens the cookie just enough to hold them securely without cracking.
- Paint on the drama:
- Use red gel icing to pipe "blood" around the fangs—dripping down is more theatrical than neat lines. Let it set completely before serving so your hands don't get sticky.
 Save
Save There's something almost ceremonial about turning a batch of chocolate cookies into vampires. My niece once declared them "the most beautiful cookies in the world," and I realized these weren't just treats—they were edible props that made the holiday feel real and magical.
When to Make Them (and Why They Never Last)
These cookies are the obvious star of Halloween parties, but I've made them for costume-contest nights, vampire-movie marathons, and even a bachelor party where grown men got weirdly competitive about who could eat one the scariest way. They're forgiving enough to bake the night before, and they store perfectly for up to 4 days in an airtight container, though I've never actually tested the four-day limit because they disappear faster than that.
Customizing Your Vampire Cookies
If you can't find candy fangs, white jelly beans work beautifully—just orient them point-first into the cookie. Slivered almonds create a different effect, more sophisticated and less silly, which is perfect if you're making these for adults instead of kids. I've also experimented with adding a pinch of cinnamon or espresso powder to the dough for depth, and both elevate the chocolate in ways that feel unexpectedly elegant for a Halloween cookie.
Storage and Freezing Hacks
Here's a trick I discovered by accident: you can freeze scooped dough on a baking sheet, then transfer the frozen portions to a bag. This means fresh-baked vampire cookies whenever you want them without the full 35-minute commitment. Store finished cookies in an airtight container with parchment between layers so they don't stick together and damage your beautiful fangs.
- If your red gel icing is too thick, a tiny drop of water mixed in makes it pipe-able without diluting the color.
- Room-temperature dough bakes more evenly than cold dough, so if you're making multiple batches, let the next batch sit while you're baking the first.
- These freeze beautifully for up to 2 months, so you can make them in bulk for the whole spooky season.
 Save
Save These cookies prove that taking food seriously doesn't mean you can't have fun with it. Whether you're baking them for Halloween chaos or just because October deserves something wicked, they're guaranteed to spark joy and disappear in record time.
Recipe FAQs
- → What gives these cookies their rich chocolate flavor?
The combination of unsweetened cocoa powder and semisweet chocolate chips creates a deep, rich chocolate taste in each cookie.
- → How do I achieve the chewy center texture?
Baking the cookies until the edges are set but the centers remain soft results in a delightfully chewy interior.
- → Can I substitute the candy fangs with other decorations?
Yes, white jelly beans or slivered almonds work well as fang substitutes, offering similar visual appeal and texture.
- → What is the purpose of the red gel icing?
The red gel icing is piped around the candy fangs to mimic blood, enhancing the spooky, vampire theme.
- → How should these treats be stored for freshness?
Store in an airtight container for up to four days to maintain their softness and flavor.
- → Are there allergen concerns to be aware of?
These treats contain wheat, eggs, dairy, and potentially soy and gelatin from candy or chocolate chips, so check ingredient labels carefully.