 Save
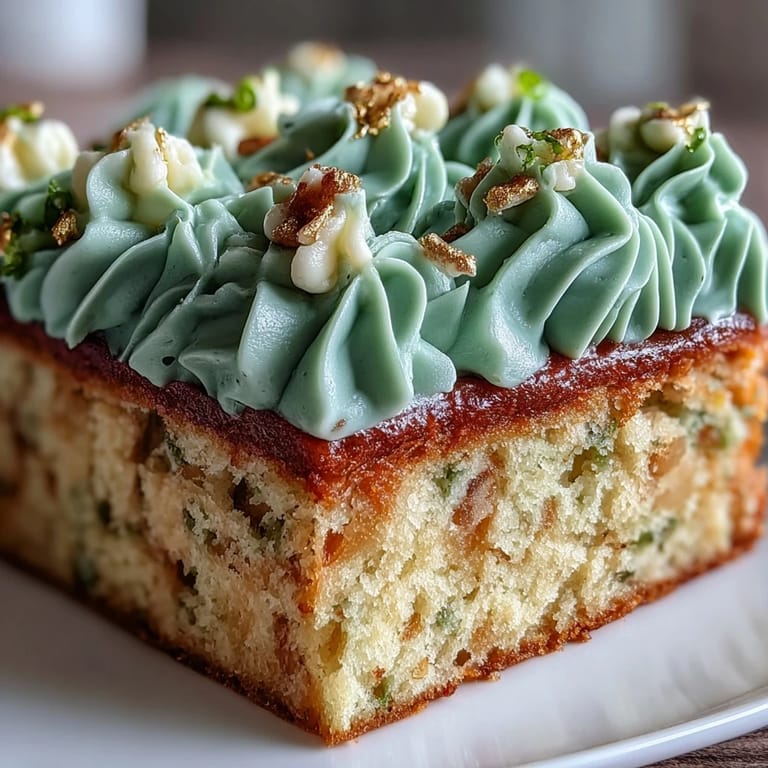
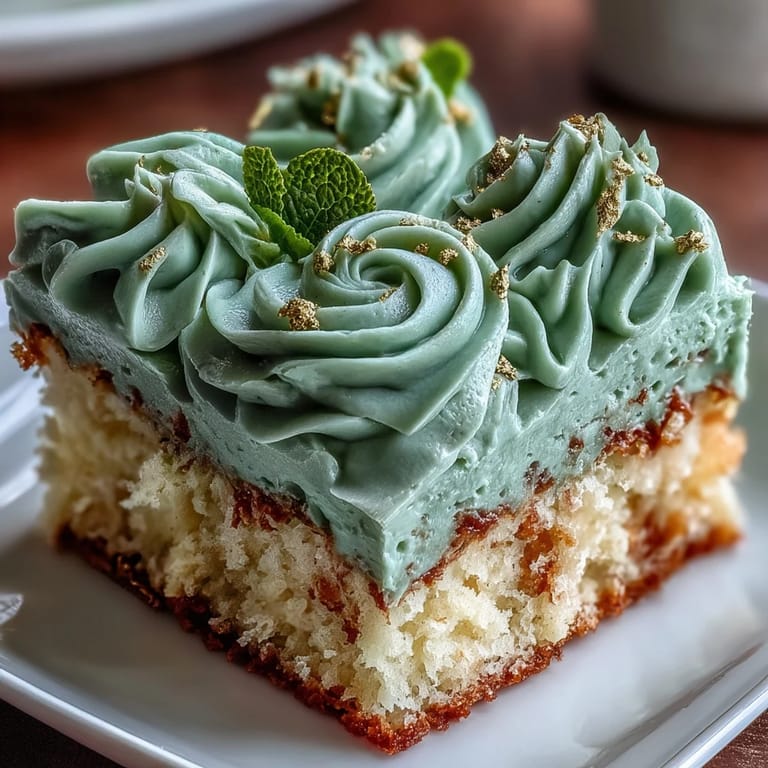
Save The first thing that caught my attention when I made this cake was the gentle pastel of the sage green buttercream swirling under my spatula, looking almost too pretty to eat. There was music on in the kitchen and, for once, I wasn’t worried about perfection—just excited to play with colors and see that shimmer from edible gold dust. The aroma of vanilla cake filled the house before I even scraped the batter into the pan. Decorating with gold felt like a playful art project, not just baking. Everyone who walked in asked what the occasion was, and it almost became a guessing game until the graduate arrived home beaming.
I remember piping little gold dots across the buttercream while my friends chatted around the kitchen island, handing me sprinkles and offering their (very passionate) opinions on the placement of every swirl. The way we all dove in for those corner slices, fingers smudged with frosting traces, still makes me laugh. This sheet cake became more than dessert; it was the centerpiece of a day filled with pride, inside jokes, and that hopeful energy you only get at graduation parties.
Ingredients
- All-purpose flour: Creates reliable structure for sheet cakes and for an extra tender bite, sift it before measuring.
- Baking powder: Gives a lift so the cake rises light and fluffy—double-check yours isn’t expired.
- Salt: A pinch sharpens the sweetness and keeps flavors bright.
- Unsalted butter (room temperature): Creams perfectly and makes the cake and buttercream luscious—soften in advance, don’t melt.
- Granulated sugar: Sweetens and helps create a tender crumb—beat thoroughly for a fine texture.
- Large eggs (room temperature): Provide structure and moisture: set out early for smooth blending.
- Pure vanilla extract: Lends deep, cozy flavor—real extract shines through.
- Whole milk (room temperature): Adds moisture and richness; take the chill off before adding or batter might seize.
- Powdered sugar (sifted): Guarantees cloud-like, lump-free buttercream—don’t skip sifting here.
- Heavy cream or milk (for buttercream): Adjusts spreadability—start with less, add more if needed.
- Sage green gel food coloring: Achieves that elegant shade; go slow and add tiny dots at a time.
- Gold edible luster dust: Instantly adds wow factor—mix with a little clear vanilla or vodka for brush-on gold.
- Clear vanilla extract or vodka (optional): Helps the gold dust paint smoothly.
Tired of Takeout? 🥡
Get 10 meals you can make faster than delivery arrives. Seriously.
One email. No spam. Unsubscribe anytime.
Instructions
- Prep the Pan and Oven:
- Line your largest sheet pan with parchment and let the oven preheat so you get an even bake from the start.
- Mix Dry Ingredients:
- Whisk flour, baking powder, and salt—notice that faint toasty aroma as the flour softens in your hands.
- Cream Butter and Sugar:
- Let your mixer run until the butter and sugar are impossibly pale and fluffy; you’ll see it almost double in size.
- Add Eggs and Vanilla:
- Beat eggs in one at a time, scraping the bowl often to catch every velvety streak, then pour in vanilla.
- Combine Wet and Dry:
- Alternate adding flour and milk in careful scoops, mixing only until the batter smooths out without overworking.
- Bake the Cake:
- Spread batter evenly, smoothing with an offset spatula, and bake until your kitchen smells like a vanilla cloud; the center should spring back when gently pressed.
- Cool Completely:
- Let the cake cool fully in the pan or your buttercream will melt right off—patience pays here.
- Make the Buttercream:
- Beat room-temp butter until creamy, then gradually add powdered sugar, splashing in cream and vanilla until you have a glossy, smooth icing.
- Tint and Reserve:
- Stir in sage green coloring, saving half a cup of white buttercream to make shimmering gold accents later.
- Frost the Cake:
- Swirl sage green buttercream generously over every inch, using broad strokes for a plush, even finish.
- Add Gold Accents:
- Mix luster dust with a drop of clear vanilla or vodka and gently paint on edges or dotted piped details; step back to admire your edible artwork.
- Decorate and Celebrate:
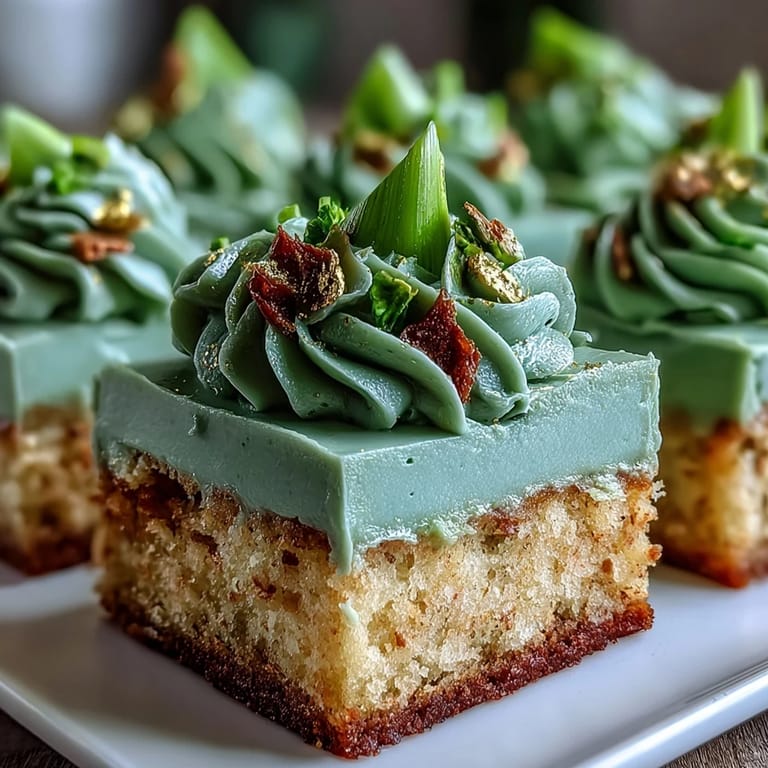
- Scatter with gold sprinkles, graduation hats, or custom touches; every slice feels like a little trophy in itself.
 Save
Save The moment that cemented this cake’s place in my heart: the graduate’s grin as she recognized her school colors spun throughout the buttercream, then watching everyone pose with their slices for endless photos. Suddenly, this cake wasn’t just a treat but a piece of the celebration itself.
Getting That Sage Green Just Right
Gel food coloring can be intense: start with the tiniest amount on a toothpick, swirling and adjusting until the shade whispers spring and not St. Patrick’s Day. I found mixing in stages lets you avoid accidentally making the buttercream too dark or too pastel. If you need to lighten, just add a bit more white frosting and keep blending until happy with the look.
Gold Accents That Shine Every Time
The first time I tried painting gold, I used water instead of clear vanilla and watched it fade away—learn from me and use a quick-drying liquid. A gentle tap with your food-safe brush helps keep a clean line whether you’re outlining graduation caps or dotting confetti. And don’t worry if it isn’t perfect; a touch of imperfection brings homemade warmth that guests love.
Celebration-Ready Serving Tips
If you chill the frosted cake for 30 minutes before slicing, you’ll get neat, professional edges every time. Use a sharp, thin-bladed knife wiped clean between cuts to set your slices apart. Serve on a platter lined with parchment so those gold details stay picture perfect longer.
- Slice extras ahead for easy sharing at the party.
- Save leftover gold accents to jazz up cupcakes or cookies.
- Store in a cool place, as buttercream softens if left near sun.
 Save
Save This celebration sheet cake is both a showstopper and a memory-maker—raise a slice with someone you love and toast to the future ahead. I hope it brings as much joy (and sparkle) to your day as it has to mine.
Recipe FAQs
- → What pan should I use for this cake?
Use a 12x18-inch sheet pan for the stated yield and baking time. Choose a light-colored pan for even browning, line with parchment, and grease the edges to ensure easy removal.
- → How do I achieve a soft sage green without streaks?
Use gel food coloring and add a tiny amount at a time to the buttercream, mixing fully between additions. A drop of yellow or a touch of brown can mute the tone for a natural sage; the color may deepen slightly as it rests.
- → What’s the best way to make gold accents?
Mix edible gold luster dust with a few drops of clear vanilla extract or vodka to create a paintable sheen, and use a food-safe brush to paint piped or piped-on buttercream. Alternatively, blend the dust with reserved buttercream for marbled gold details.
- → How can I keep the cake moist?
Cream butter and sugar until light, avoid overmixing once flour is added, and alternate flour with milk to maintain a tender crumb. Bake until a toothpick comes out clean and avoid overbaking; cooling in the pan helps retain moisture.
- → How should I store leftovers?
Store covered at room temperature for up to 2 days or refrigerate in an airtight container for up to 5 days. Bring slices to room temperature before serving to restore the buttercream's softness.
- → Can I adapt this for dietary needs?
Use a 1:1 gluten-free flour blend to make it gluten-free, though texture may vary. For dairy-free versions, choose plant-based butter and milk substitutes and adjust liquid or powdered sugar to reach the desired buttercream consistency.