 Save
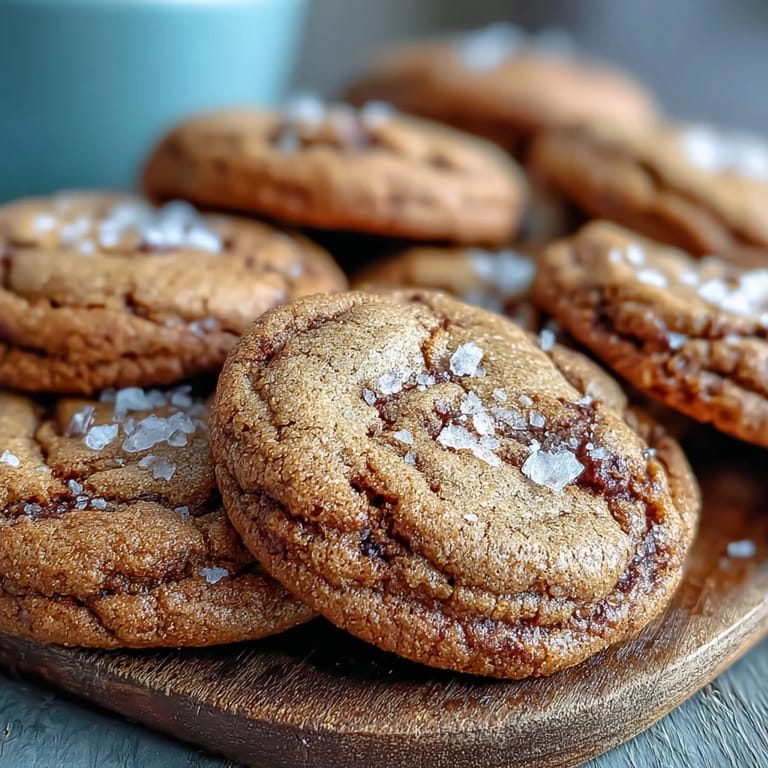
Save I discovered hojicha on a gray afternoon when a friend brought back a tin from Tokyo, and I became obsessed with that toasty, almost smoky flavor that somehow felt both grounding and delicate. Months later, while melting butter for another batch of cookies, the nutty aroma hit me differently, and I thought: what if I could bottle that same warmth into something with hojicha? These brown butter cookies were born from that exact moment, and they've become the kind of thing I make when I want to feel like I'm sharing a secret with whoever gets to eat them.
I made these for my neighbor last winter when she was going through a rough patch, and she called me the next day just to ask how I got the centers so soft and chewy. It wasn't really about the cookies, though she ate the whole box. It was about having something warm and thoughtful to hand over when words felt inadequate.
Ingredients
- Brown butter (170 g): This is where the magic starts, so don't rush it or walk away from the stove. You're looking for that moment when the milk solids turn golden and the whole kitchen smells like toasted hazelnuts.
- All-purpose flour (250 g): The foundation that keeps everything tender, nothing special needed here.
- Hojicha powder (2 tbsp): This roasted green tea is the soul of the cookie, with an earthy depth that brown butter understands perfectly. Find it at Japanese markets or order online, and make sure you're getting the powder not the leaves.
- Brown sugar (150 g) and granulated sugar (50 g): The combination creates chewiness in the center while the granulated sugar helps with spread and texture, a lesson I learned after one batch that turned out too cakey.
- Egg and egg yolk: The extra yolk gives you that luxurious richness without making them cake-like, it's the difference between a cookie you want to eat one of and a cookie you can't stop eating.
- Baking soda (1 tsp) and fine sea salt (1/2 tsp): These aren't just there to be polite, they balance the sweetness and help the hojicha flavor come forward instead of hiding behind sugar.
- Vanilla extract (2 tsp): Use the real stuff, it matters here more than you'd think.
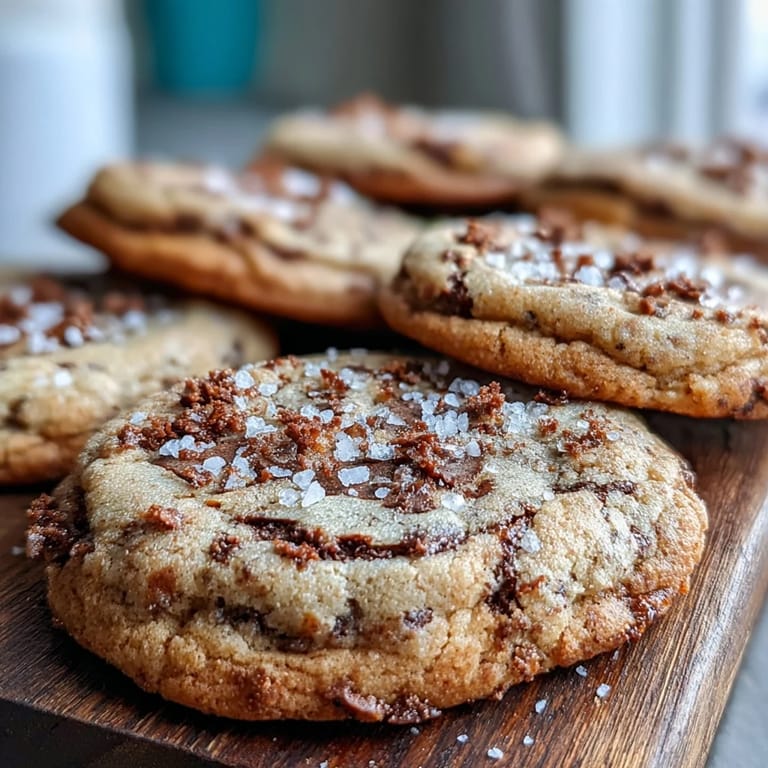
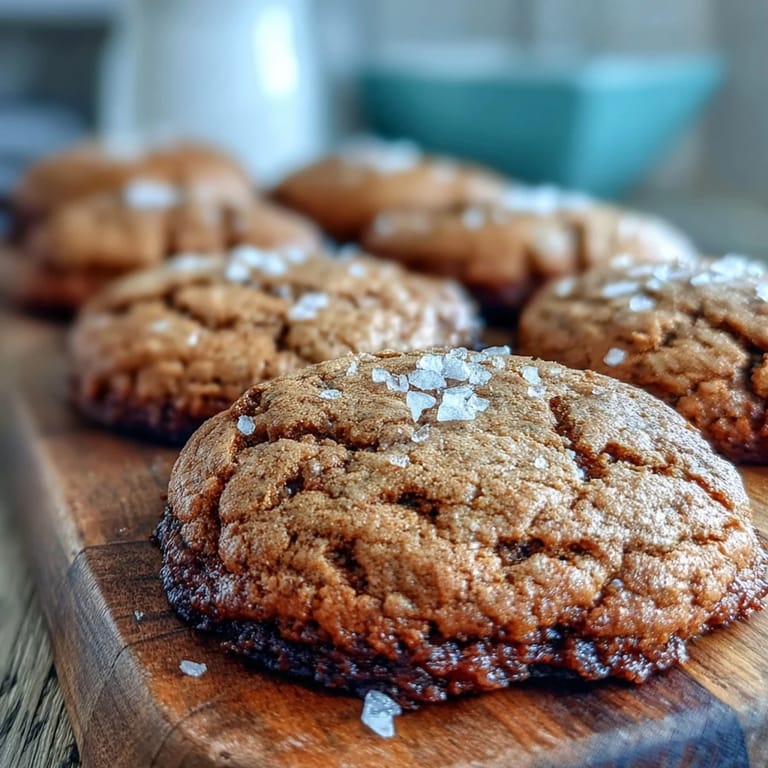
- Flaky sea salt for topping: This is optional but honestly it's the difference between a good cookie and one you'll think about for days.
Tired of Takeout? 🥡
Get 10 meals you can make faster than delivery arrives. Seriously.
One email. No spam. Unsubscribe anytime.
Instructions
- Brown Your Butter Like You Mean It:
- Melt the butter over medium heat and don't leave it alone, swirling the pan occasionally so it browns evenly. You'll hear a gentle sizzle, then foam will appear, then the solids at the bottom will turn golden and smell absolutely incredible, like toasted nuts and caramel had a conversation. Immediately pour it into a heatproof bowl to stop the cooking, then let it cool for 10 minutes while you get your other ingredients ready.
- Mix Your Dry Team:
- In a medium bowl, whisk together the flour, baking soda, salt, and hojicha powder until there are no streaks of tea left. This step is where you're building flavor, so take a breath and make sure everything is evenly distributed.
- Combine the Wet Ingredients:
- Pour your cooled brown butter into a large bowl with both sugars and whisk until everything is combined and looks almost smooth. Add the egg, egg yolk, and vanilla, then whisk again until the mixture is smooth and has thickened slightly, which takes maybe a minute or two.
- Bring It Together:
- Add your dry mixture to the wet mixture and stir with a spatula until just combined, which means stop as soon as you don't see any streaks of flour. Overmixing is the enemy of tender cookies, something I learned the hard way with a batch that was more like little hockey pucks.
- Chill If You Have Time:
- Cover the dough and refrigerate for 30 minutes if you want thicker, chewier cookies with less spread. I usually do this, but I've also skipped it when I was impatient and they still turned out delicious, just a little thinner.
- Heat Your Oven and Prep:
- Preheat to 175°C (350°F) and line two baking sheets with parchment paper so cleanup is almost zero. This is the moment the cookies start becoming real.
- Scoop and Space:
- Using a tablespoon or small cookie scoop, place balls of dough about 5 cm apart on your prepared sheets, remembering they'll spread a little as they bake. Don't crowd them or you'll end up with one giant cookie instead of 24 individual ones.
- Bake Until Golden:
- Bake for 10 to 12 minutes, watching for the edges to turn golden while the centers still look slightly underbaked, which is exactly what you want. The centers will continue cooking as they cool, and you'll end up with that perfect texture contrast.
- The Salt Moment:
- The second they come out of the oven, sprinkle them with flaky sea salt if you're using it, letting the residual heat help it cling. Let them cool on the tray for 5 minutes to set up, then transfer to a wire rack to cool completely.
 Save
Save There's something about the moment when someone bites into one of these cookies and their eyes get a little wide because they weren't expecting that complexity, that interplay of nutty brown butter and roasted tea and that finishing salt. That's when I know this recipe has done what I wanted it to do.
The Brown Butter Factor
Brown butter is one of those cooking techniques that sounds fancy but is really just patience and attention, which honestly describes most good cooking. The moment those milk solids start caramelizing, you're adding this deep, almost savory sweetness that makes hojicha sing instead of whisper. I used to think brown butter was just for salted caramel or sage pasta, but once I started using it in cookies, I couldn't go back to regular butter.
Why Hojicha Works Here
Hojicha is green tea that's been roasted at high temperatures, which mellows out the grassiness and creates these warm, toasted flavors that honestly sound like they shouldn't work in a sweet cookie. But that's exactly why they do, because hojicha doesn't compete with sugar the way other teas might, it complements it and adds a layer that makes people ask for your recipe. The first time I made these, someone described them as tasting like a crispy autumn afternoon, and I think that's pretty much perfect.
Storage and Variations That Work
These cookies stay crispy at room temperature for a few days in an airtight container, but they're best within the first 48 hours when the texture contrast is most pronounced. You can freeze the dough balls for up to a month and bake them straight from frozen, adding just a minute or two to the baking time, which means you can have fresh cookies whenever the craving hits.
- White chocolate chips stirred into the dough add sweetness and richness, though honestly I find them unnecessary because the cookies are already pretty complete.
- Chopped pecans or walnuts echo the brown butter's nuttiness and add a textural element that some people absolutely crave.
- If you can't find hojicha powder, matcha works in a pinch, though it'll taste grassier and less roasted, so use slightly less.
 Save
Save These cookies are my answer to anyone asking what Japanese and Western baking can do when they actually like each other. Every time I make them, I'm reminded that the best recipes are the ones where every ingredient has something to say.
Recipe FAQs
- → What does hojicha taste like in cookies?
Hojicha adds earthy, nutty, and slightly toasty notes to the cookies. Unlike matcha's grassy brightness, hojicha has a milder, more caramel-like flavor that pairs beautifully with brown butter.
- → Can I substitute the hojicha powder?
You can use matcha powder for a grassier flavor, or try roasted green tea powder. For a different twist, coffee powder or cocoa powder would work, though they'll change the flavor profile significantly.
- → Why is brown butter used in these cookies?
Brown butter adds a rich, nutty flavor that complements the roasted hojicha perfectly. The browning process caramelizes the milk solids, creating depth and complexity in the final treat.
- → How should I store these cookies?
Store in an airtight container at room temperature for up to 5 days. They also freeze beautifully—place cooled treats in a freezer-safe bag for up to 1 month. Thaw at room temperature before serving.
- → Can I skip the chilling step?
Chilling is recommended for thicker, chewier results, but if you're pressed for time, you can bake immediately. Just note that the cookies may spread more and have a slightly crispier texture.