Save
Save The first time I tasted hojicha ice cream was at a small tea shop tucked away in Kyoto, where the owner served it in a delicate ceramic cup barely larger than my palm. The moment it melted on my tongue, I understood why this humble roasted tea deserved such careful treatment, why the nutty caramel notes sang so clearly against the cool cream. I spent that entire afternoon wondering if I could recreate that magic in my own kitchen, and after several attempts, a few small disasters, and one perfectly timed conversation with a tea vendor at the farmer's market, I finally figured out the secret. It turns out the magic wasn't complicated at all, just patience and respect for the ingredient itself.
I made this for my neighbor one sweltering July evening when she stopped by with homemade mochi, and we ended up sitting on the porch well past sunset, trading spoonfuls between her dessert and mine. She kept saying it tasted like autumn in a bowl, which made me laugh because I'd been stressing about whether the steep time was long enough. That night taught me that sometimes the best dishes are the ones you share without overthinking, and hojicha ice cream became the thing I now make whenever someone needs reminding that dessert can be both comforting and unexpected.
Ingredients
- Heavy cream (2 cups) and whole milk (1 cup): The ratio matters here, the heavy cream gives you that silk-on-the-tongue richness while the milk keeps things from becoming too dense, and together they're the canvas for everything else.
- Hojicha loose leaf tea (3 tablespoons): This is where your whole recipe lives, so resist the urge to use a bargain tea, find one that smells warm and toasty rather than musty, and consider buying from a tea shop where they can describe the roast level to you.
- Egg yolks (4 large), granulated sugar (2/3 cup), and fine sea salt (pinch): The yolks create that custard base that separates proper ice cream from sorbet, the sugar dissolves into the cream creating that smooth mouthfeel, and the salt is your secret weapon for brightening the flavor without making it salty.
Tired of Takeout? 🥡
Get 10 meals you can make faster than delivery arrives. Seriously.
One email. No spam. Unsubscribe anytime.
Instructions
- Heat your cream and milk gently:
- Pour both into a saucepan and watch it carefully over medium heat until you see small wisps of steam rising and the surface shivers slightly, but never let it boil or you'll scald the dairy and ruin the delicate flavor you're building. This should take about 5 to 8 minutes depending on your stove.
- Steep the hojicha like you mean it:
- Add your tea leaves right to the hot milk, reduce the heat to low, cover the pan with a lid, and let it sit for exactly 10 minutes, resisting the urge to peek or stir, because this is when all that roasted, caramel-like magic transfers into your cream. You'll know it's ready when the liquid looks like liquid amber and smells like toasted autumn.
- Strain with intention:
- Pour everything through a fine sieve into a bowl, pressing gently on the tea leaves with the back of a spoon to coax out every last bit of flavor, but don't crush them into a pulp or you'll muddy the taste. Return the infused milk back to your saucepan for the next step.
- Prepare your egg mixture:
- In a separate bowl, whisk together your egg yolks, sugar, and salt until the mixture turns pale yellow and slightly thickened, which usually takes about 2 to 3 minutes of steady whisking. You're aerating the yolks and dissolving the sugar so everything will set up smoothly.
- Temper those yolks carefully:
- This is the part where people get nervous, but it's just physics: slowly pour about a cup of your warm hojicha mixture into the yolks while whisking constantly, never stopping the whisking motion, which gradually brings the yolks up to temperature without scrambling them. Once it looks smooth and the yolks aren't shiny anymore, you've done it.
- Combine everything:
- Pour the yolk mixture back into your saucepan with the remaining hojicha milk, stirring gently to combine everything evenly. You're now making actual custard.
- Cook until you hit the magic temperature:
- Set your heat to low and stir constantly with a wooden spoon, scraping the bottom and sides of the pan where heat likes to concentrate, until the custard thickens enough to coat the back of the spoon and a finger drawn through it leaves a clean trail, about 170 to 175 degrees Fahrenheit if you're using a thermometer. This takes patience, usually 8 to 12 minutes, but rushing it risks scrambled eggs and you'll know immediately if that happens.
- Strain one more time:
- Pour everything through a fine sieve into a clean bowl to catch any stray bits of cooked egg or tea, then let it cool to room temperature naturally, which takes about 20 to 30 minutes. This step feels fussy but it's worth it for the silky final texture.
- Chill thoroughly:
- Cover your custard and refrigerate for at least 4 hours, though overnight is even better, because cold custard churns into smoother ice cream than warm custard. I usually do this step in the evening and churn the next morning.
- Churn according to your machine:
- Follow your ice cream maker's instructions, which usually means letting the mixture churn for 20 to 30 minutes until it reaches soft-serve consistency. Listen for the sound of the motor to change or watch for the mixture to move more slowly, which tells you it's ready.
- Freeze for proper firmness:
- Transfer to an airtight container and freeze for at least 2 hours before serving, though 4 hours gives you a better scoop-able texture. I always freeze mine overnight because life is busy and morning-made ice cream is rarely actually ready by evening.
 Save
Save There was this one afternoon when I served this to my friend who claims she doesn't really like ice cream, and she went quiet for a moment, then asked if she could have a second small scoop, and I realized that sometimes a dish becomes important not because it's complicated but because it changes someone's mind about something they thought they knew about themselves. That's what hojicha ice cream does for people.
Why Hojicha Deserves Your Respect
Hojicha is green tea that's been roasted at high temperatures, a process that removes the grassy notes and creates something warmer, almost toasted, with hints of caramel and nuts that feel less like tea and more like comfort. Most people who claim they don't like green tea will actually love hojicha because the roasting creates a completely different flavor profile, one that's naturally sweet and approachable. When you're steeping it in warm cream, you're not fighting against astringency, you're just coaxing out something that was always meant to be gentle.
The Churning Decision
If you don't have an ice cream maker, this recipe becomes more of a challenge but not impossible, you can freeze the custard in a shallow pan and stir it every 30 minutes for 3 to 4 hours, though you'll get a grainier texture because you're not aerating it the way a machine does. Some people swear by the food processor method, thawing the frozen custard slightly and pulsing it until creamy, which works but requires patience and several stop-and-start cycles. The ice cream maker method genuinely gives you the best result, but I understand not everyone has one taking up freezer space.
Serving and Storing Your Creation
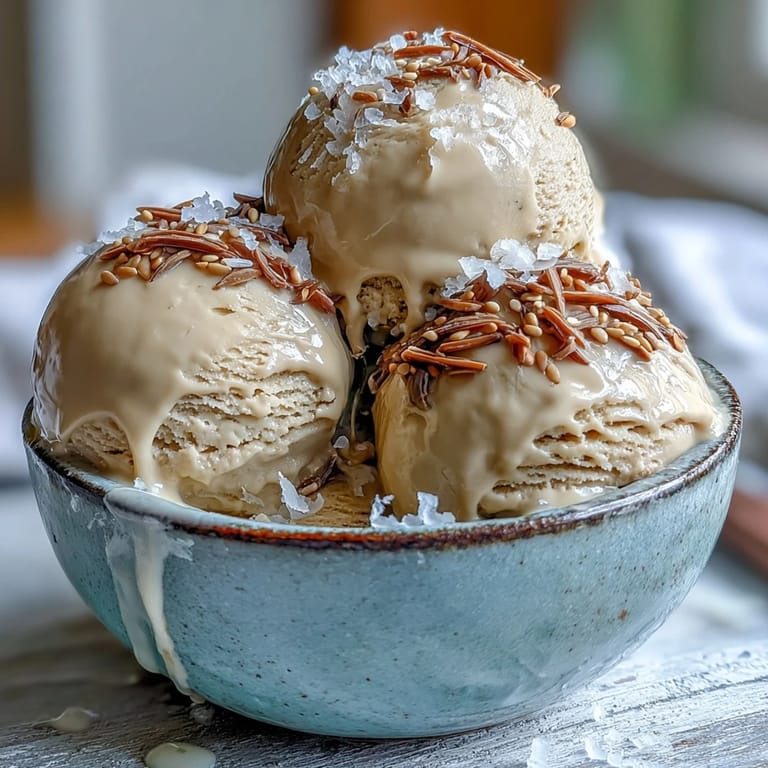
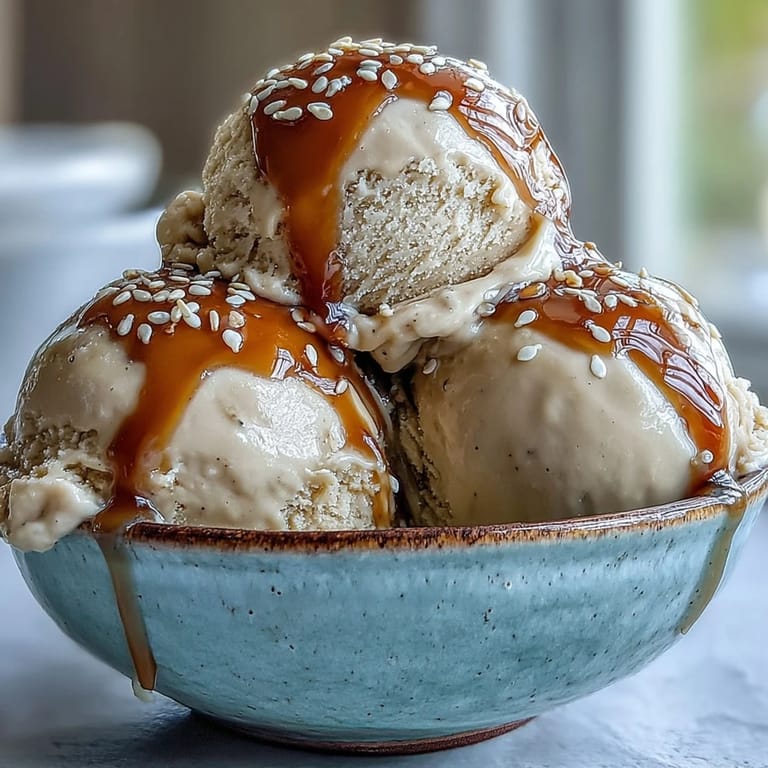
This ice cream keeps beautifully for up to two weeks in an airtight container, though the texture is best in the first week when the ice crystals haven't had time to grow large. Let it sit on the counter for 5 to 10 minutes before scooping if it's been frozen solid, which makes the scooping infinitely less frustrating and the flavor more pronounced. Consider toasting some sesame seeds, drizzling a bit of sweetened condensed milk, or serving alongside fresh mochi or berries for a complete moment.
- Hojicha ice cream tastes even better the day after churning, when the flavors have melded and settled into something richer than they were fresh.
- If you find your ice cream is too hard to scoop, your freezer is probably colder than most, so try thawing it an extra 10 to 15 minutes or store it in a slightly warmer part of your freezer.
- Make this when you have fresh hojicha on hand because the tea loses its aromatic qualities over time, so check your tea's purchase date before committing to this recipe.
 Save
Save Making hojicha ice cream is an act of patience rewarded, a reminder that sometimes the most elegant desserts come from respecting your ingredients and trusting the process. Serve it to someone you want to impress, or keep it all for yourself on an evening when you need something that tastes like both comfort and sophistication.
Recipe FAQs
- → What does hojicha taste like?
Hojicha offers distinct nutty, caramel-like notes with a mild roasted character. Unlike other green teas, the roasting process reduces bitterness and creates a naturally sweet, earthy flavor profile that shines beautifully in creamy frozen desserts.
- → Can I make this without an ice cream maker?
While an ice cream maker creates the smoothest texture, you can freeze the custard in a shallow container, whisking vigorously every 30 minutes for the first 3 hours to break up ice crystals. The result will be slightly denser but still delicious.
- → How long does homemade ice cream keep?
Properly stored in an airtight container, this frozen treat maintains best quality for 1-2 weeks. For optimal texture and flavor, consume within the first week. Ice crystals may form over time, but a brief thaw on the counter helps restore creaminess.
- → What makes this dessert unique?
The roasted green tea infusion creates sophisticated layers of flavor—earthy undertones balanced by natural sweetness. The Japanese tea adds complexity that pairs beautifully with the rich dairy base, resulting in an elegant dessert that feels both comforting and refined.
- → Can I use hojicha powder instead of loose leaf?
Yes, substitute 2 tablespoons of hojicha powder for the loose leaf tea. Whisk the powder directly into the warm milk mixture, then strain to remove any lumps before proceeding with the custard. The powder creates a more intense color and slightly stronger flavor.